turn your wedding cards into a book {diy}
Update March 6, 2020: Yes! I am still taking orders for these! Email me at [email protected] or visit this page on my website to get started!
Update: I have updated & clarified a few steps. At this point, I have made well over 300 books for others & have learned a few things!
Sometimes I am a hoarder. I find sentiment in the weirdest & smallest things like a Dr Pepper can tab & I simply can't throw it away. Other times, I have zero problems throwing things out. But when it comes to greeting cards, I hold on to most of them like my life depends on them. The special ones will never see a trash can.
Last fall was my wedding, & the summer was filled with bridal showers & parties, & my box of wedding cards grew & grew. I knew I wanted to turn my wedding greeting cards into a book, but wasn't entirely sure how. I looked through Pinterest for some inspiration but only found cards bound with giant circle clips. I wanted something more polished, so, I let the idea simmer in the back of my mind while I came up with a plan.
I referenced ways to bind your own books, bought all the necessary materials, & made up a few steps as I went. I started working on an idea, almost finished, came up with better idea, then started over.
So, bust out the needle & thread. We're sewing!
Unfortunately, I had a few tiny cards that I couldn't sew into the book. The best solution for that would be to make an envelope or sleeve attached to the back cover for those tiny cards to slip in & out of. But, this post does not cover that aspect.
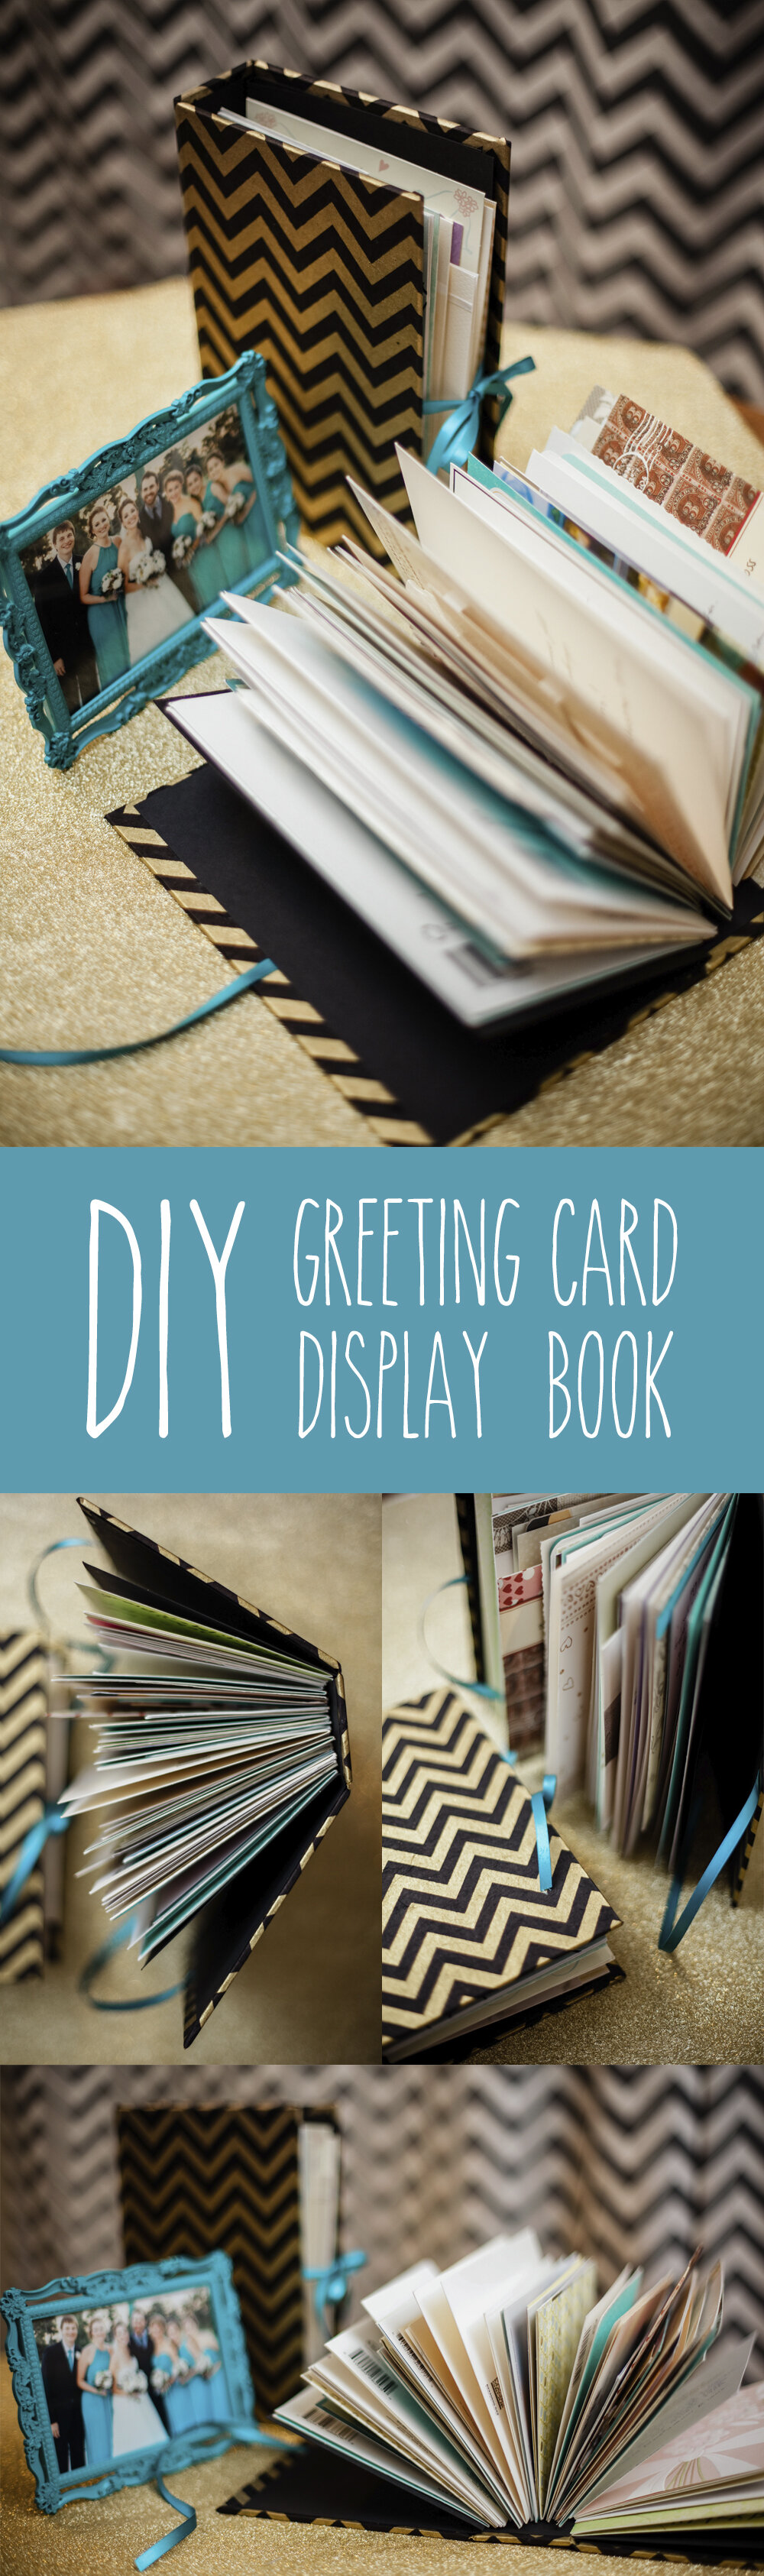
I ended up with about 65 cards from my wedding, so I split them into two books. I felt it would be sturdier if I made two skinnier books rather than one super fat book.
Update: I have found that books over 3” become too cumbersome. I suggest keeping your books under 2.5” thick with 3” being your max thickness. If you can easily hold your stack of cards in one hand, it should be fine.

materials needed:
All of the materials depend on what size your book is going to be. Measure out your biggest card to get a minimum size.
paper or book cloth for the cover
ribbon // long enough to wrap around your cards & tie into a bow
canvas // the width needs to be the thickness of your stack of cards plus 4"; the height needs to be roughly 5"; you can buy a 12x12" piece of canvas in the scrapbooking aisle of Hobby Lobby
canvas // I have started adding a layer of canvas in between the book board pieces & the cover paper (not as important if you’re using book cloth); size should be the size of your final book board pieces (front & back cover & spine) + 1/2” for width
cardstock paper // at least 3 sheets
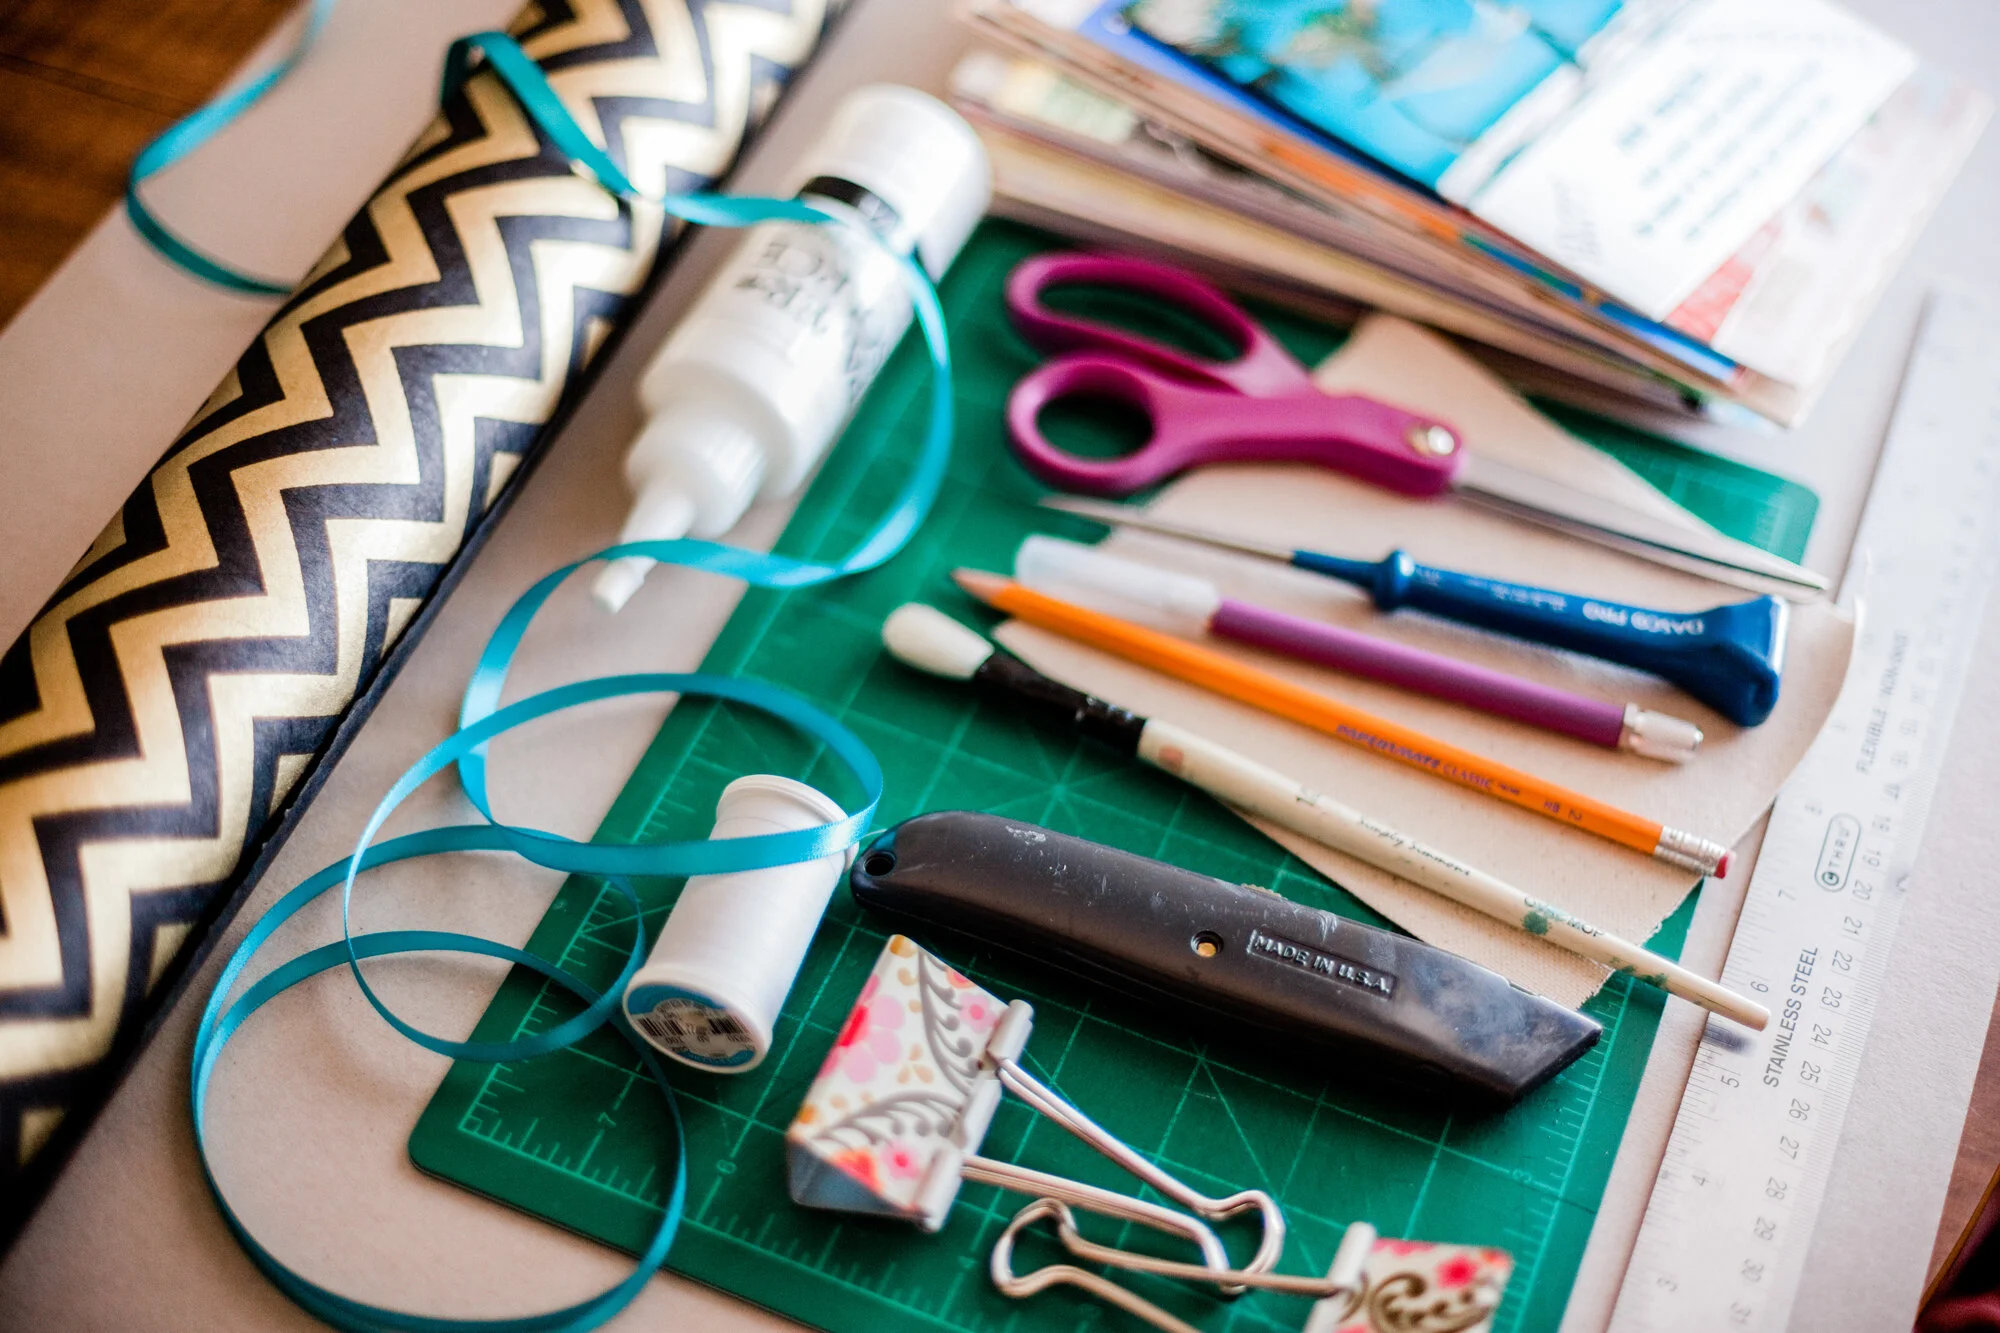
tools needed:
exacto blade
scissors
box cutters // for cutting book board; you can use an exacto blade, but book board is really thick & tough to cut
cutting board // not necessary, but if you're using an exacto blade, you'll want to protect your table!
ruler // preferably metal
paintbrush
awl // for the record I couldn't find one at Hobby Lobby; I finally found one at Home Depot
needle
thread // I used white for the cards & black for the end leafs
big clips
Step 1: Organize your cards
This is purely optional & up to you on how you do this. I put all of my immediate family cards at the beginning & alphabetized the rest.
Update: I personally do not like when cards are arranged by size (ie, smallest to biggest). To me, the final product looks & works best when the cards are randomly sorted in terms of size.
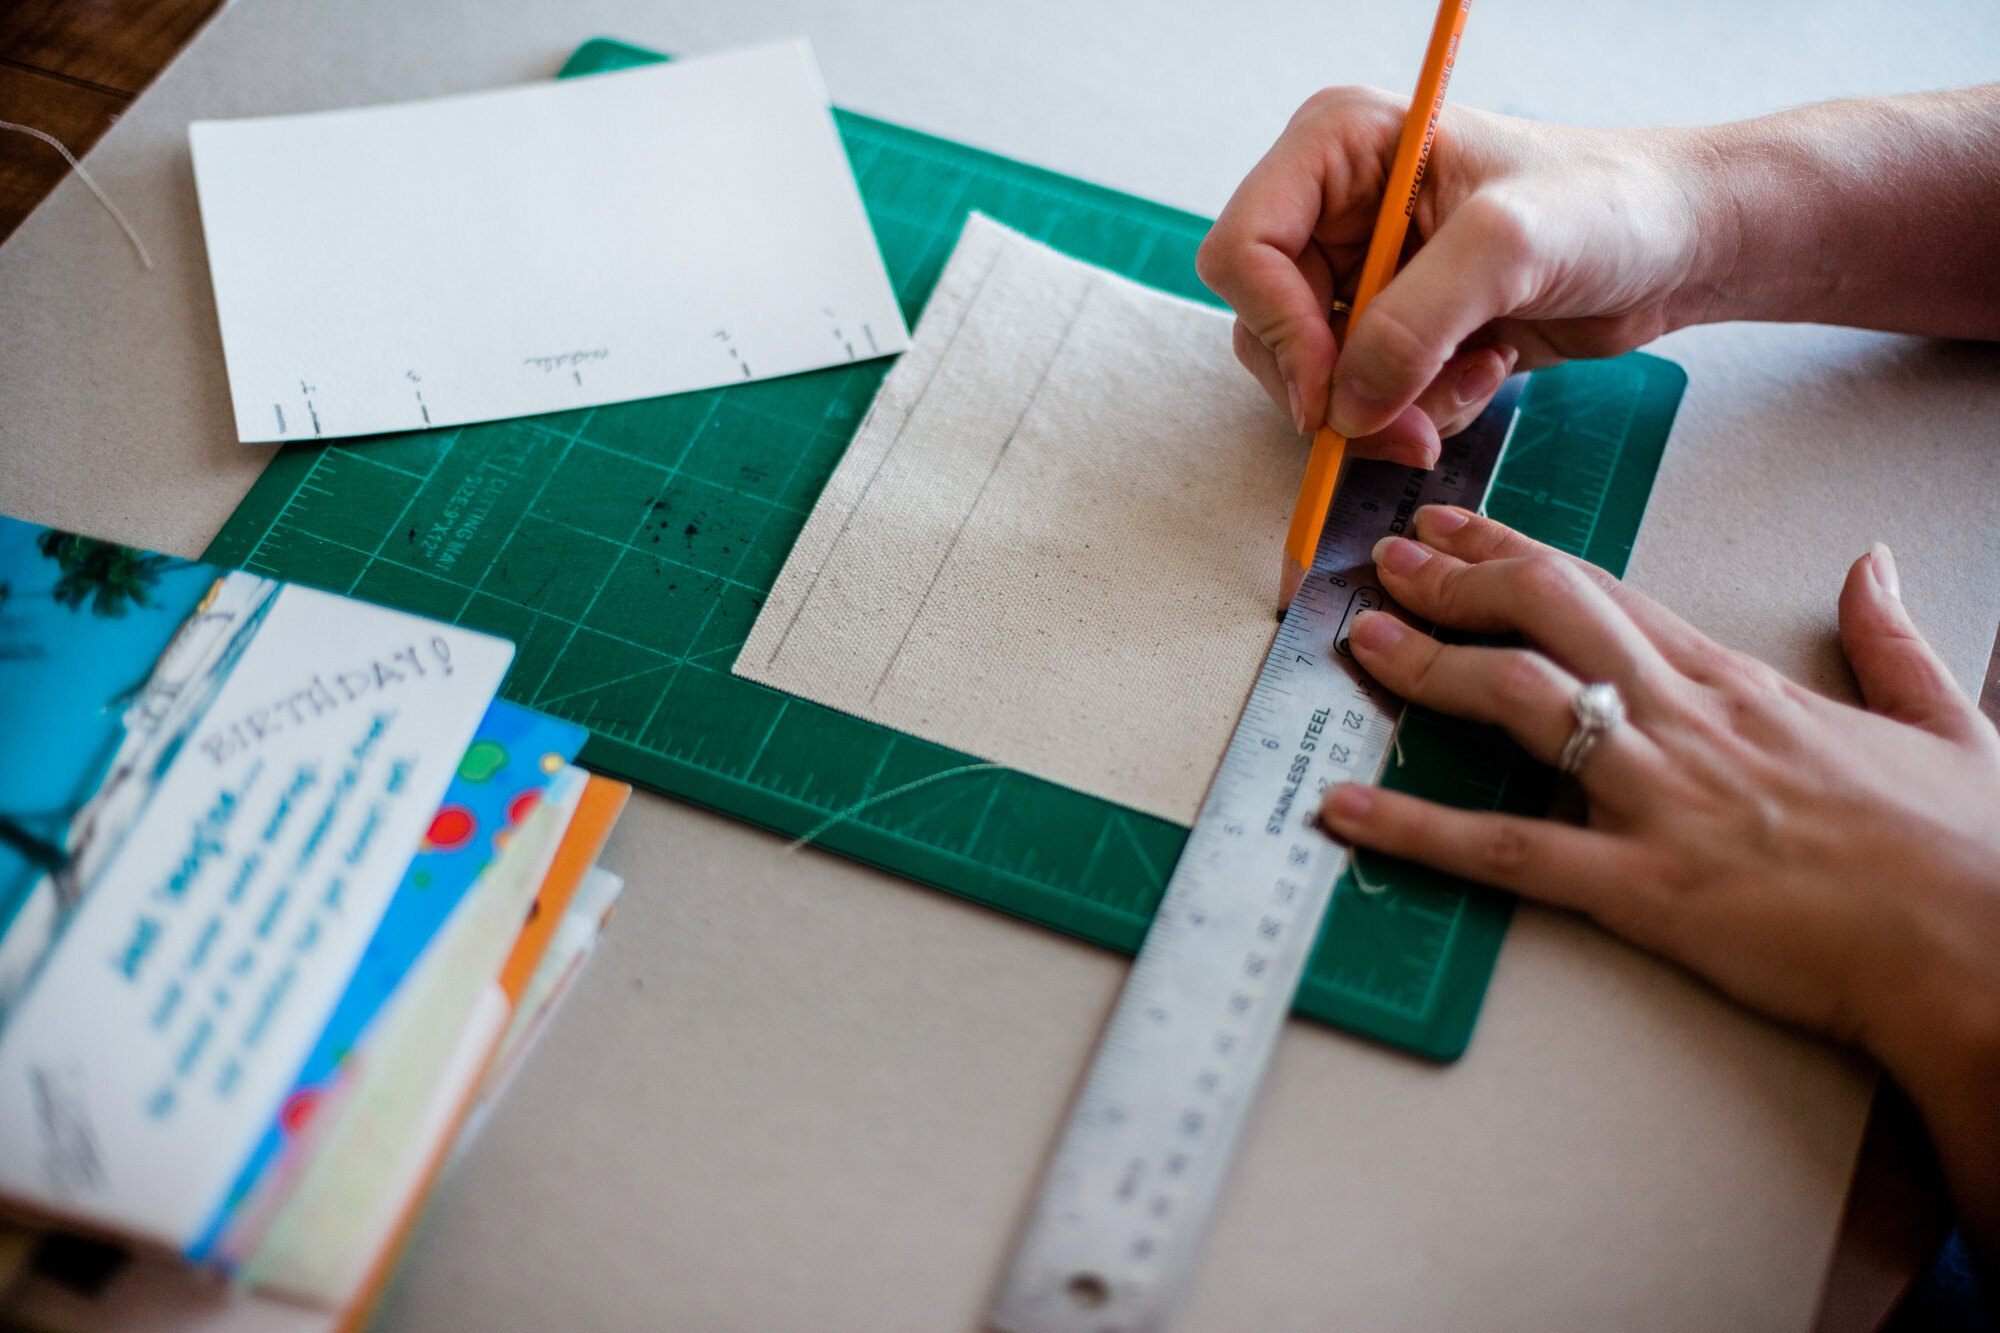
Step 2: make a template
My smallest card was about 6" wide. I drew a template on a piece of scrap cardstock, marked the center of the card, & marked out two sets of lines 1/4" from either end. The sets of lines were 1" wide.
Update: My current template that works extremely well is spaced like so: Holes 1 & 2 are 1” apart, 2 & 3 are 1.5” apart, 3, & 4 are 1” apart. I have 1.4” markings on either side of 1 & 4. You’ll use those lines when creating your canvas later.
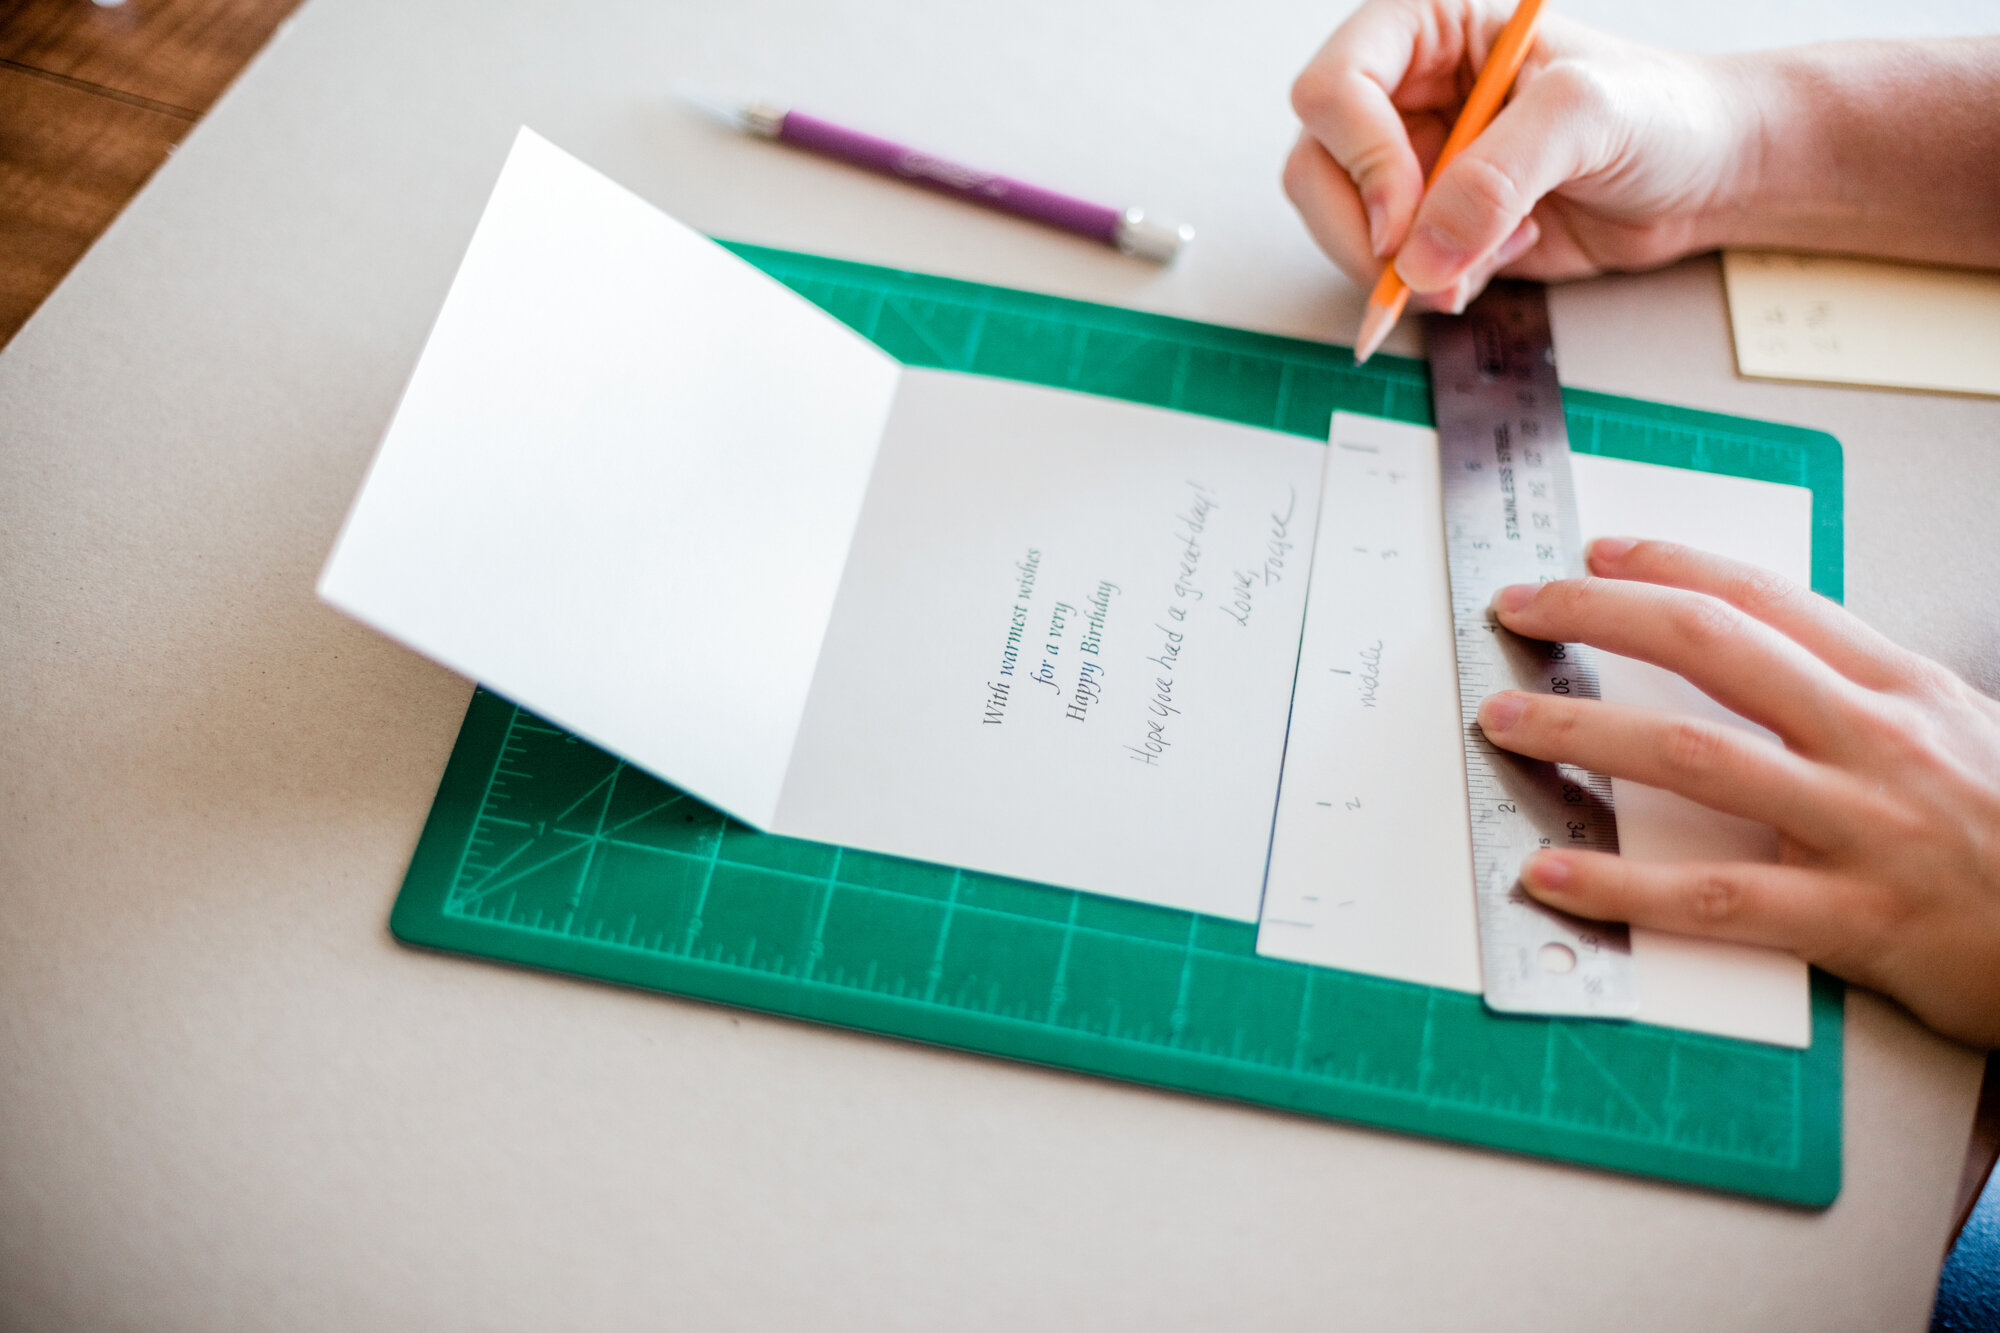
I numbered the lines 1–4. The lines would mark where on each card I would punch my holes for sewing.

Step 3: punch holes into cards
Using the template I just made, I grabbed my awl & set to work punching four holes into the fold of each card. If you're not using an awl, just use a very pointy object to punch small holes. The hole only needs to be big enough for a regular needle.
Update: Flat or vertically folding cards only need 3 holes. For those, punch hole #1, #4, & the middle, or whatever fits best for that individual card.

Since my template wasn't as long as some of my cards, I used the ruler to make sure I was centered up correctly. Most of the time I could just eyeball it, but there were a few big cards that needed to be perfectly centered. The bigger cards do need to be centered as well as you can in order for them to not hang out of your final book later.

For most of the cards, punching holes was simple. However, a few cards needed a little bit of attention first. Some cards had an extra layer of paper on the front panel that was something like 1/16" longer the rest of the card. This gets in the way when you open it, so using my ruler & exacto blade, I trimmed down the unnecessary length of paper.
Note: Be careful not to cut the fold of the card; that will weaken the card & may cause it to rip out of the final book.

My mom wanted a book made out of her 50th birthday cards, so this is what I'm working on in some of these photos. She had this one card that opened not only vertically (the fold was at the top), but also had a pop out. I contemplated throwing this card out, but we've already discussed how I can't do that, so I got a little creative.

I trimmed off about 1/16" on the left side of the front panel of the card & on the back panel. I checked & double checked that, when sewed down, it would still open all the way & wouldn't get stuck on the stitches.
Update: This method works for almost all cards that open vertically. Once you’ve trimmed the front/top part of the card, treat it like a flat card & punch only three holes on the bottom/back flap of the card.
Update: You’ll notice in the image below I stopped about an inch away from the actual fold. I’ve started trimming all the way to the fold because I feel it looks better. Use scissors for cards when you can’t lay it flat to trim due to a lot of embellishments or for cards that you don’t want to trim all the way through every layer.


For accordion style cards, I again trimmed down about 1/16" of the front panel so it wouldn't interfere with the stitches, then punched the holes in the back fold. For cards with multiple folds, sometimes I punch & sew each fold depending on what looks best.


I encountered a card that was die-cut at the top. I checked its height against the other cards & decided that if I centered the template on the fold & not on the card, it would not stick out at the top above the other cards.
Update: I’ve discovered that as long as you have at least two good stitches holding down a card, it is sturdy. Center your template on on your card & punch your 4 holes (or 3 for flat cards) anywhere between the boundaries of the 1st & 4th holes on your template & you’ll be good. You can sew down most every card, even the tinier gift tags. For cards or notes that are simply too flimsy or odd, you can make a pocket or add an envelope (same hole punching & sewing principles apply) to the end of the book.)

The very next card was also die-cut, but its fold was relatively short. So, I shifted the template again, keeping the two sets of holes 1" apart from each other & 1/4" from either end, essentially shrinking the distance between the two sets of holes.

Continue punching holes & trimming cards until you reach the end of your stack.
Update: I remove most ribbons that come attached to cards. If it’s easy to remove & doesn’t affect the design of the card, remove it. It will be easier to sew your cards together while keeping them even & flush with each other.
step 4: cut your canvas piece
Measure the thickness of your cards & add at least 2" to either end. For the height, you want it wide enough to cover the holes, with an additional 1/4" trim (or more) on either end. This is basically the height of your shortest card.

Using your template, draw lines on the canvas to help you line up your cards when sewing. Draw perpendicular lines at the 2” mark so you know where to place your first card & keep it even. You’ll want at least 1/4” buffer on either side of line 1 & 4 in case of canvas fraying.
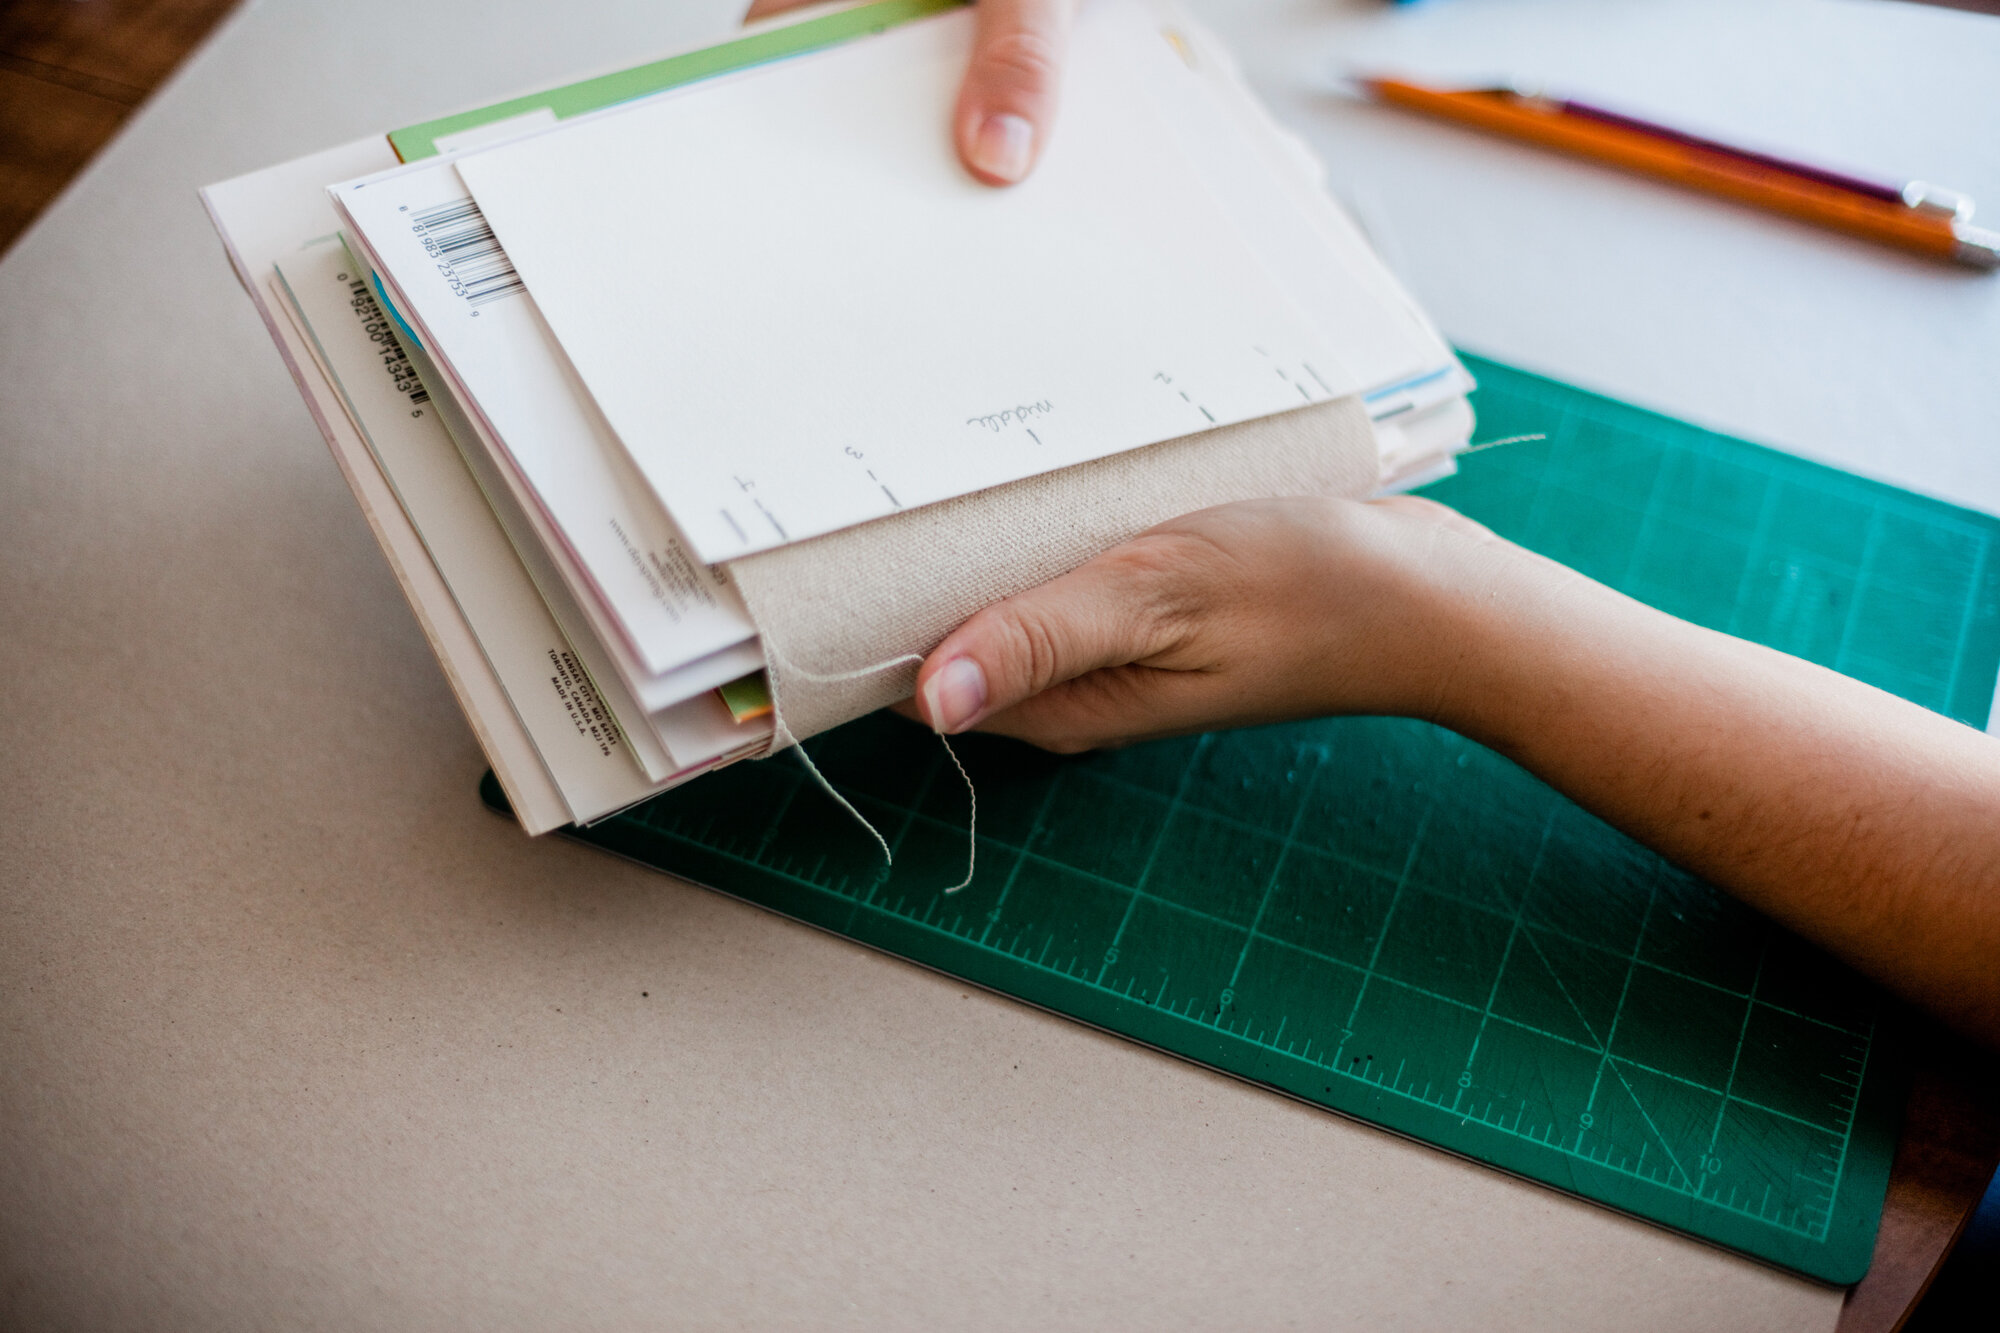
step 5: sew your cards together
This is when you turn on a season of your favorite tv show & settle in for a few episodes. This is the longest part of the whole process, & patience is greatly needed. If you've never sewn before (especially by hand), do not be surprised if you have to start over a few times. I did & I'm not new to sewing. Be patient while you work with the first few cards. Once you get more than 5 cards sewn down, it will get much easier.
I worked with lengths of thread that were about 2 yards long. Thread your needle, then tie the two ends together into a good knot & pull the needle to the opposite end of the knot. Now, you're ready. I used general purpose sewing thread. There might be a better choice out there, but I didn't look.
Remember how I labeled the template & the holes 1–4? Line your first card up on the lines in the spot you want (2" from one end of the canvas). Start on the back of the canvas (so the knot is on the back) & thread your needle through the top hole (hole #1). Thread back out through the 2nd, in through the 3rd, & out through the 4th (the bottom). Line up your next card (keeping it tight!), thread through the 4th (or bottom) hole, & work your way back to the 1st hole.
Recap:
in 1
out 2
in 3
out 4
new card
in 4
out 3
in 2
out 1
repeat
For flat cards, the process is the same except you’ll do simple loops through each hole:
in & out 1
in & out 2.5 (the middle hole)
in & out 4
To help keep the cards tight against each other, I use large clips (see photo below.)
Keep an eye out for knots. Sometimes they’re easy to fix. If you caught one too late (& it’s on the backside of the canvas) & don’t want to undo everything, make sure the threads are pulled to the back of the canvas. You’ll put glue on this later so it won’t matter as much. If the knot is on the front side of the card, I recommend backtracking.


When you're done, it should look something like this.

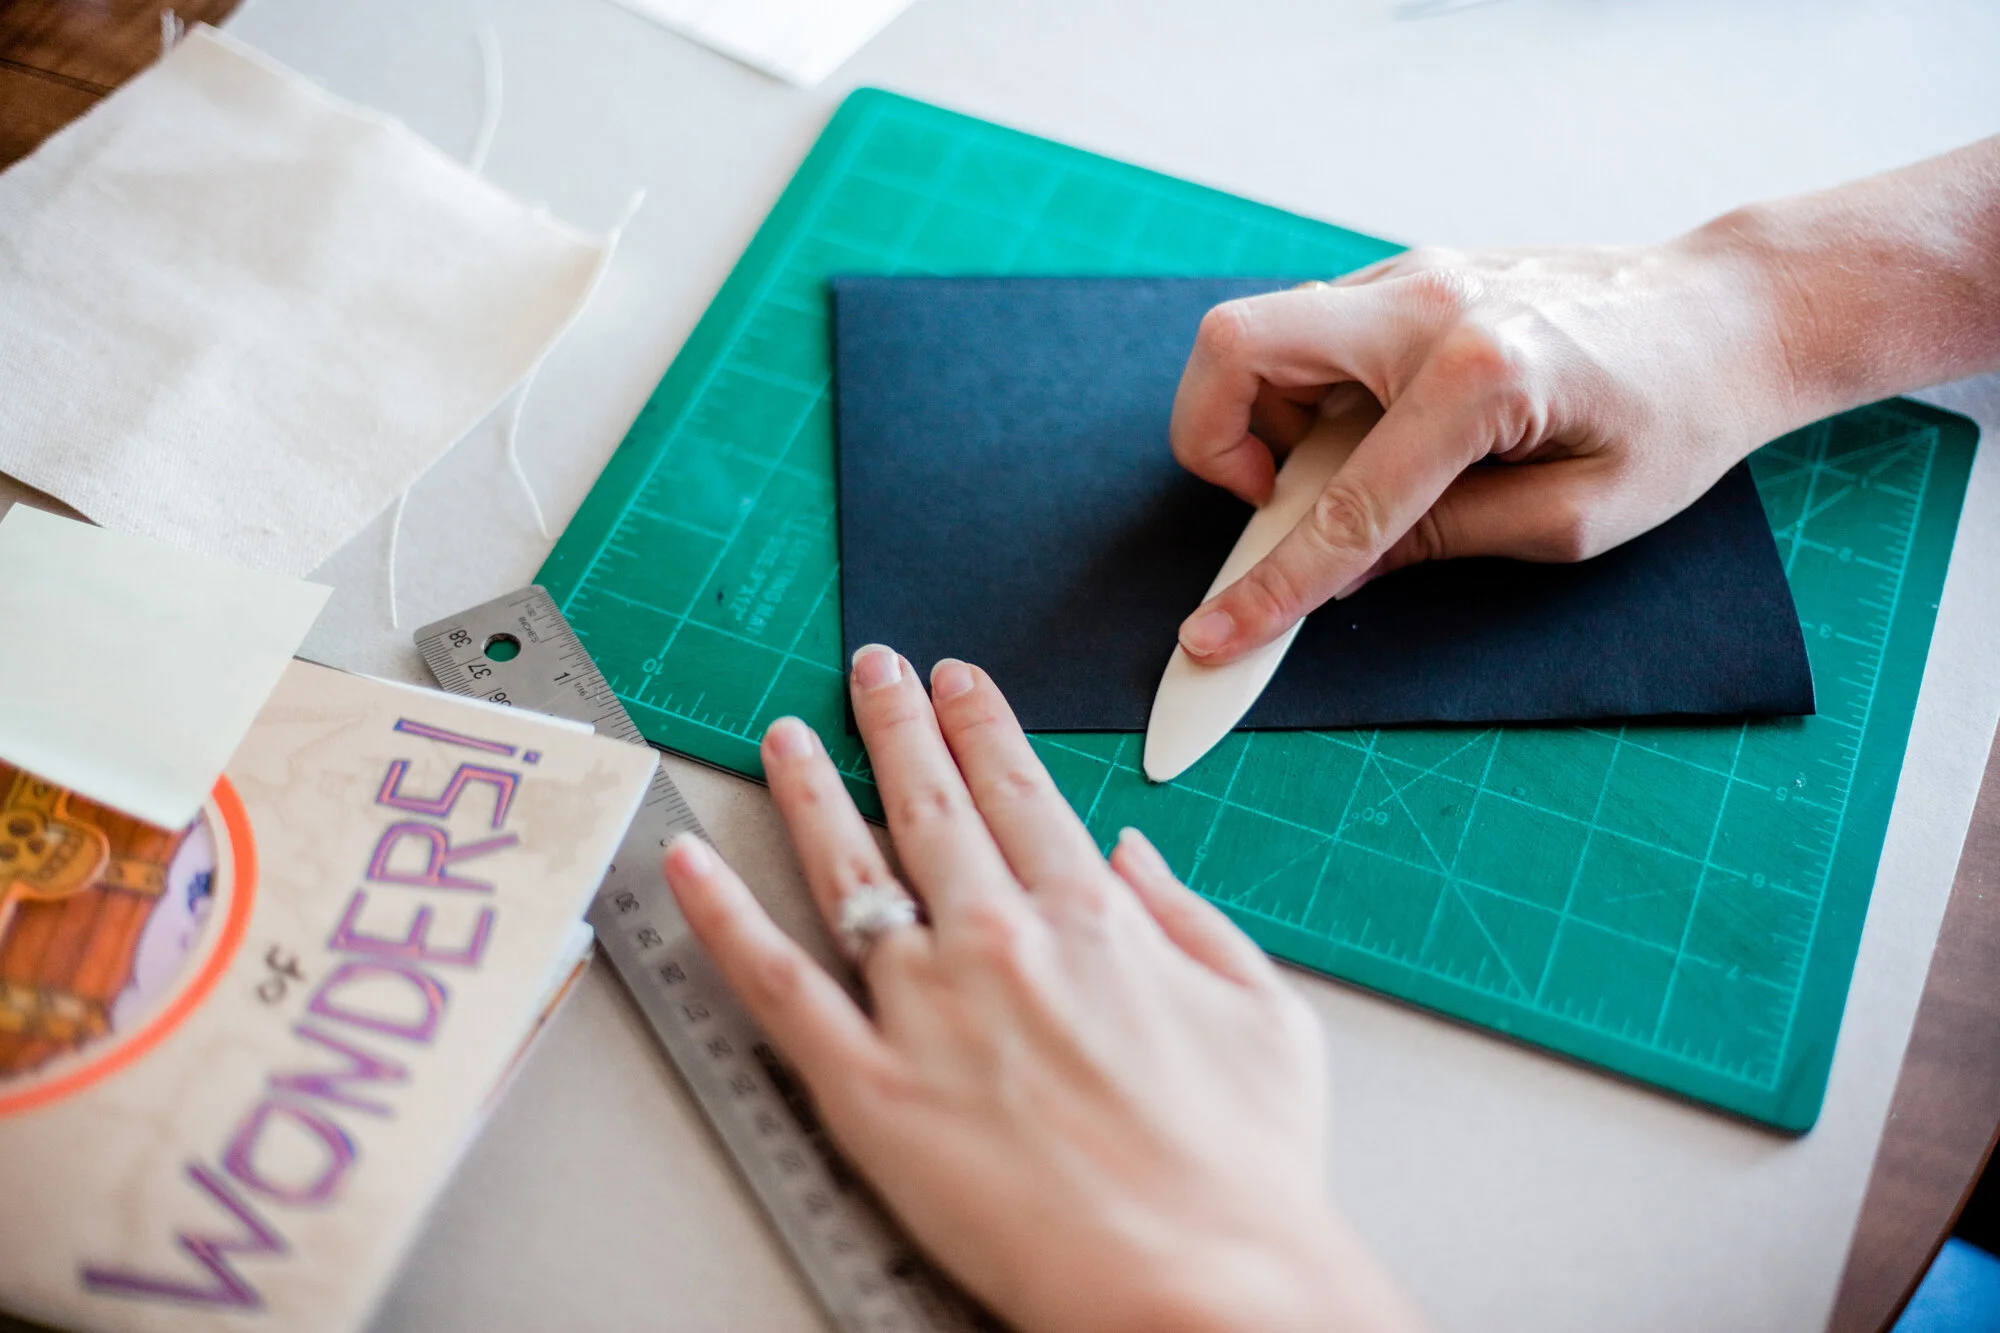
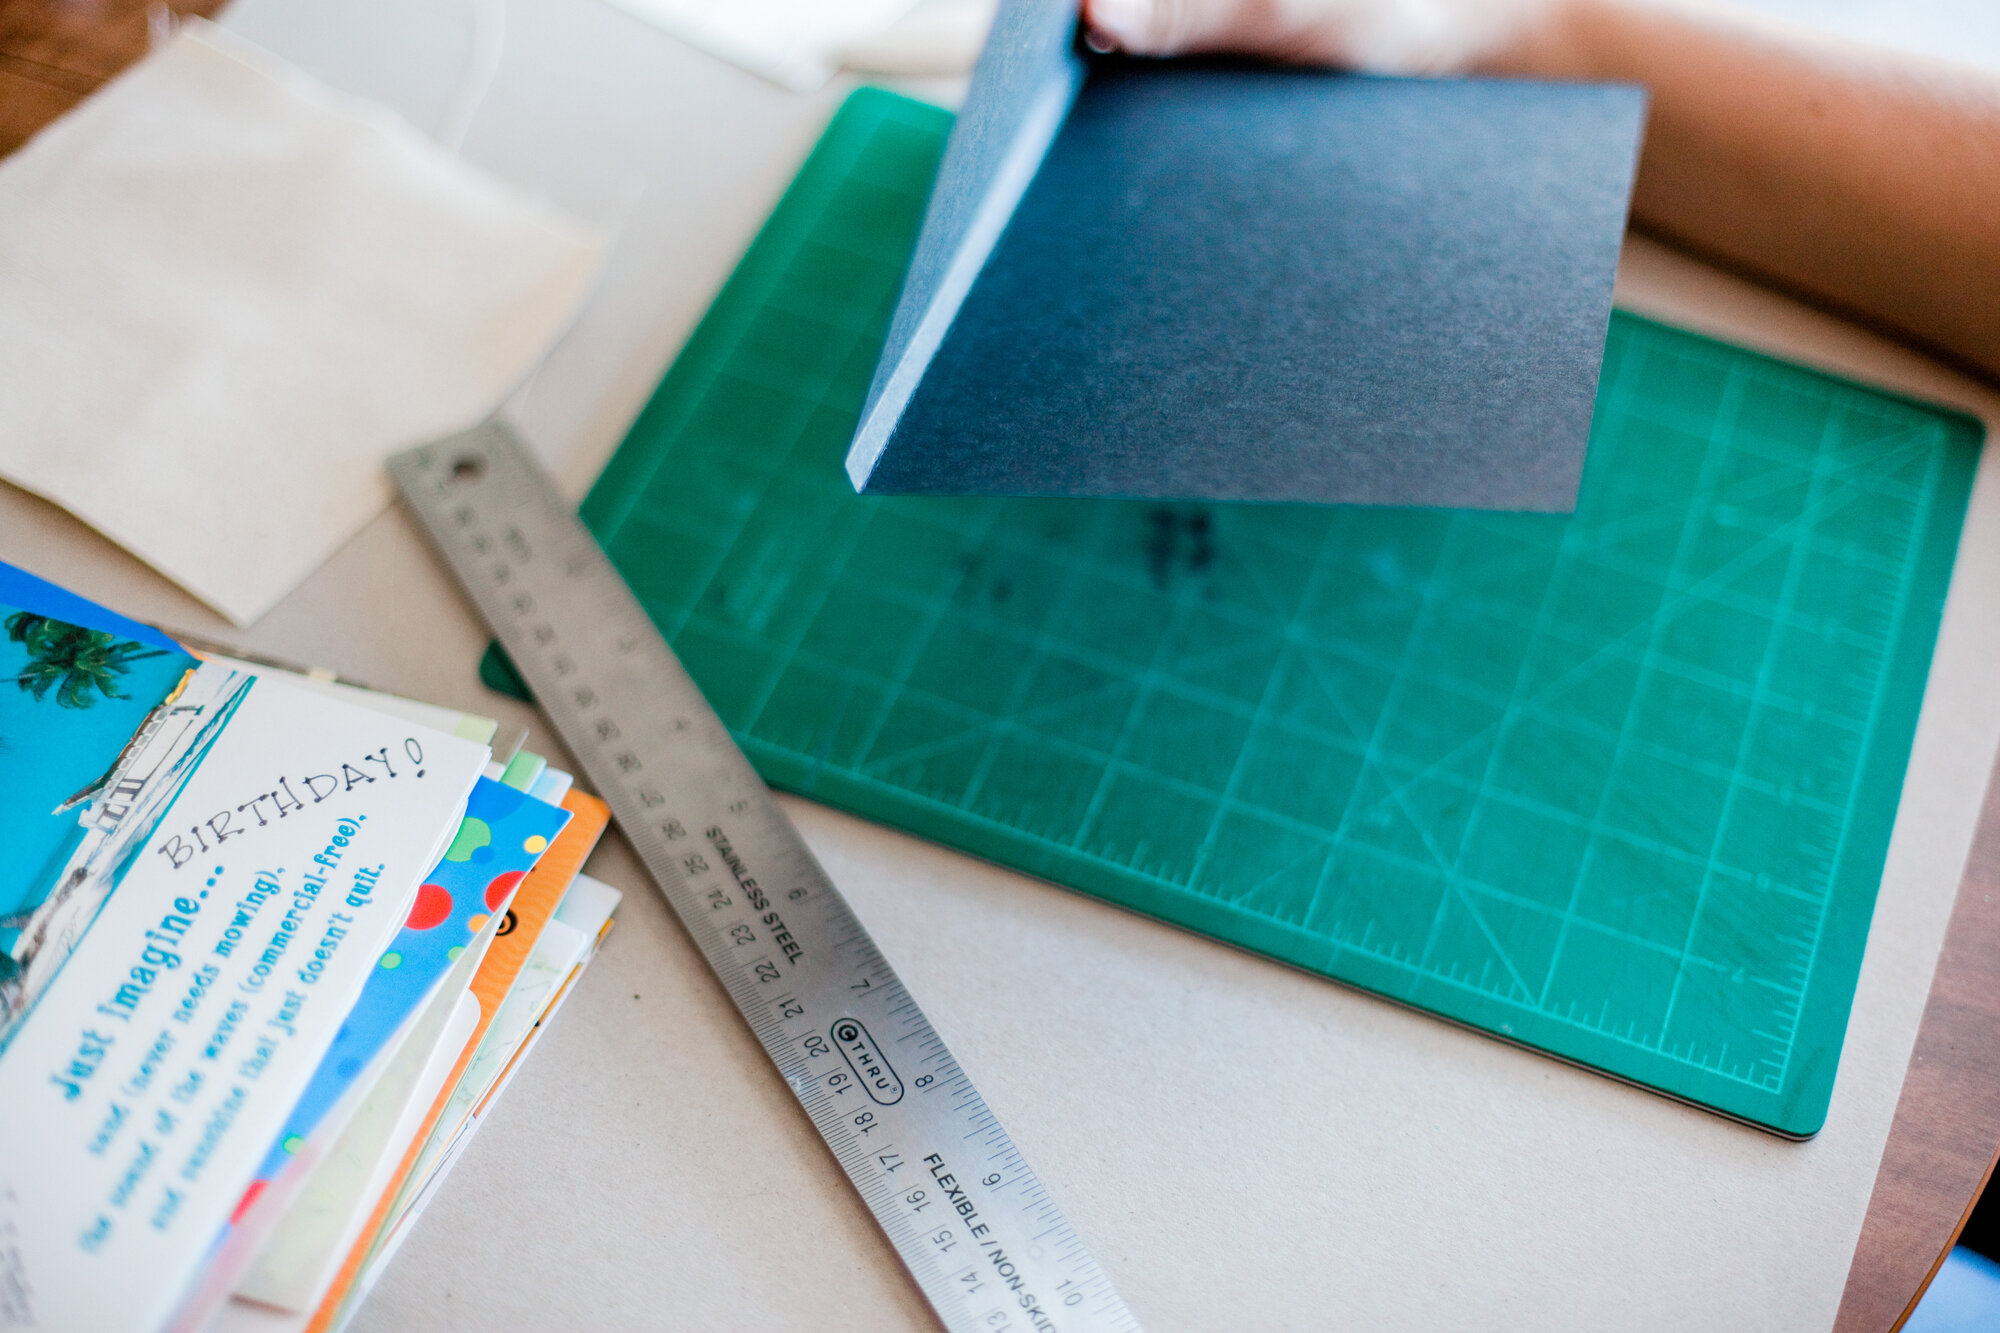
step 6: cut & score two end leafs
The end leaf of a book is the blank piece of paper at the front that spans across the first page to the inside cover. There is an end leaf at the beginning & ending of every book. I used black cardstock to coordinate with the paper for the cover. This is heavier weight paper than printer paper.
For my project, an 8.5x11" piece of cardstock was just the right size for an end leaf. Find the middle 1/4" of the cardstock & score & fold two lines using a bone folder. If you don't have a bone folder, use something hard & narrow to create the score. It also comes in handy when making crisp folds. You will want to make two end leafs.

step 7: sew end leafs into book
Use your template & awl to punch holes into one of the folds on each end leaf. Then sew the end leafs onto either ends of the cards. Place the fold with the holes closest to your card. I used white thread for the cards, but switched to black when sewing in these bad boys to keep it neat & streamlined. Make sure both end leafs are even with each other on the canvas because these parts will later be glued down to the cover & you don't want them lopsided. You’ll want your big cards to be centered with the end leafs.
Done with the sewing! It should look something like this.
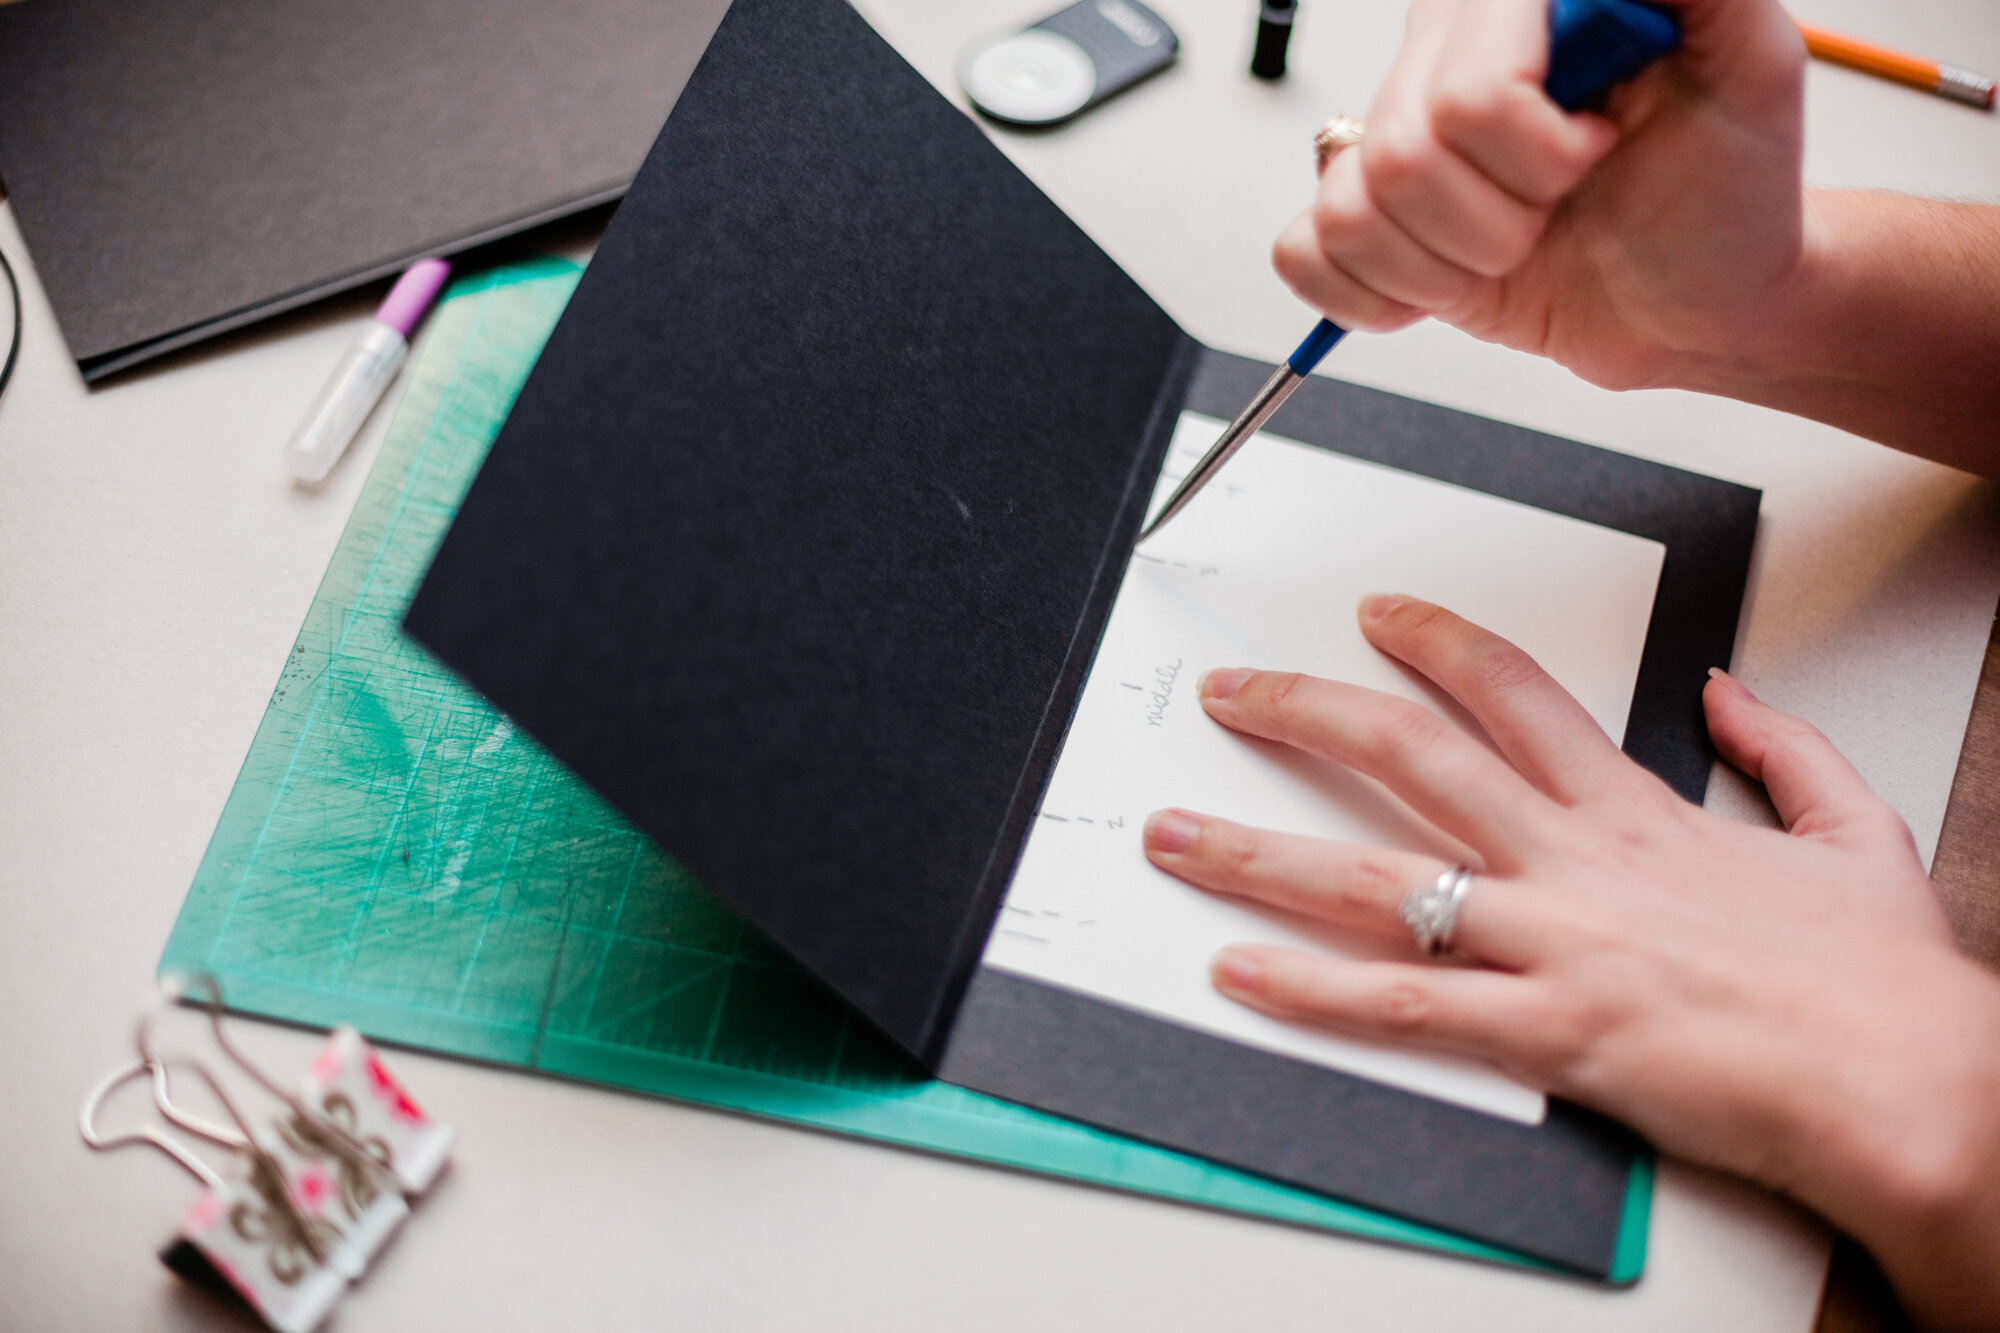


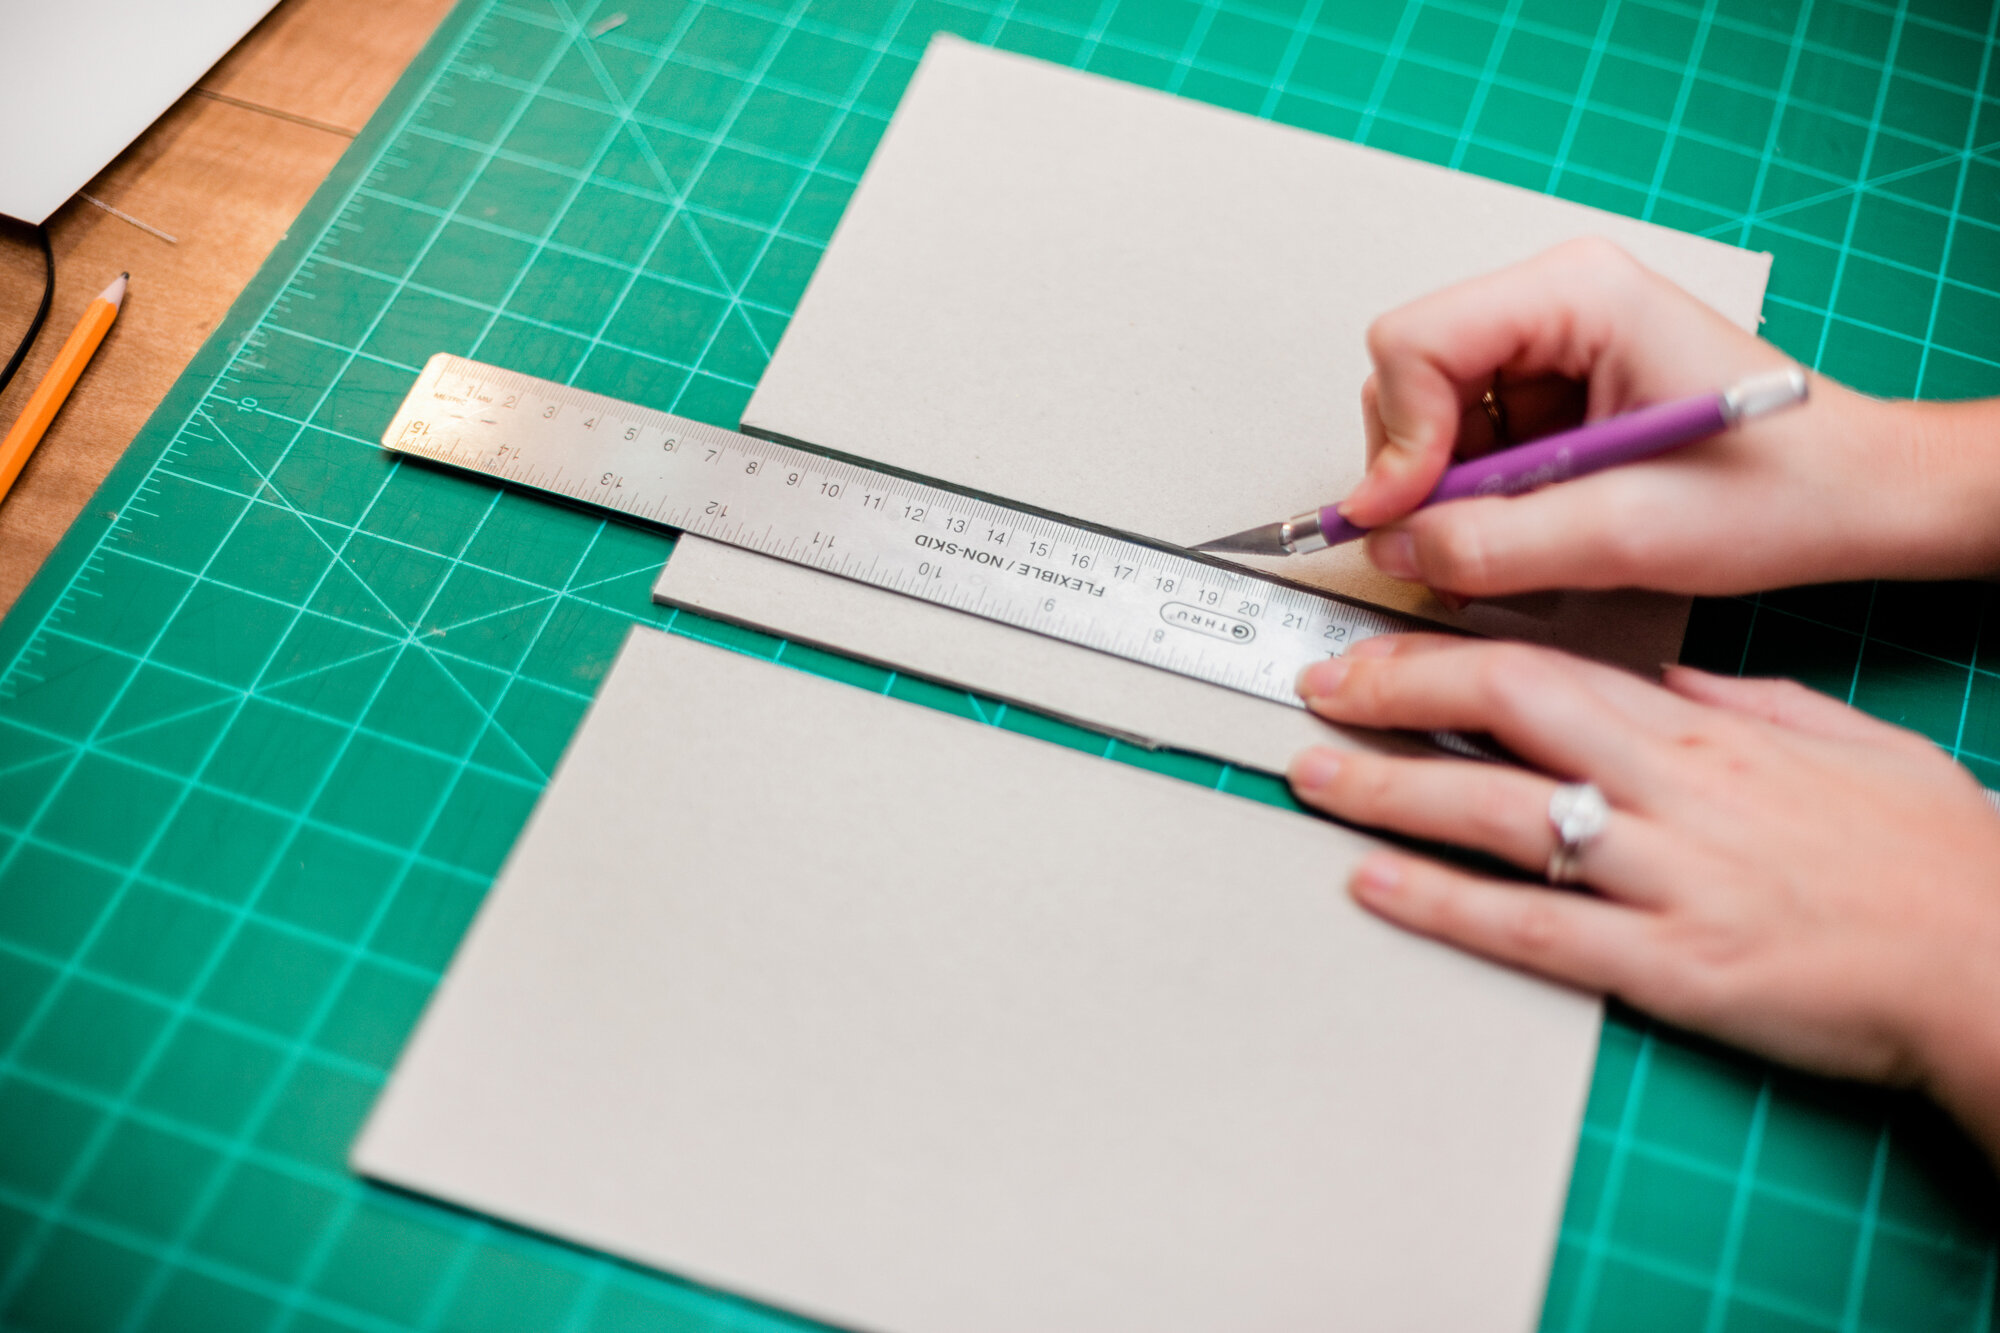
step 8: cut book board pieces
Measure your biggest card (or the tallest & widest cards) & add a 1/4" to determine the width for your cover. Add 1/2" to determine the height.
Your spine should be the depth of your cards sewn together. Remember how the end leafs had a 1/4" fold? Don't count that in the depth measurement. Measure from the inside of the folds.
I recommend cutting your book board with boxcutters (ignore my exacto blade in the following photos.)

UPDATE: STEP 8.5: GLUE BOOK BOARD TO CANVAS & TRIM
This is something I’ve added in recent years. Since I was shipping cards to customers, too many times the box would get crushed & the spine would break through the cover paper. Since I was already ordering canvas by the yard, I had plenty on hand. So, I now glue the book board directly to the canvas, keeping them even & straight, & with 1/4” between the pieces. Trim to the edges of the book board using boxcutters.
Other cloth material would probably work as long as it was on the sturdy side. If you’re using book cloth for the cover, this step isn’t necessary.
From there, I simply lay this whole thing on my paper, trace a rough outline, & add 2” to all sides.
When you go to glue this part to your cover paper, it is very important that you smooth out the paper using your bone folder. Start in the center & work outwards making big sweeping motions using pressure. Most of the paper I work with are handmade with a lot of fibers. Papers that have a very smooth finish (think printed images on printer paper) have a tendency to bubble severely. The more you smooth & work on the paper the better it will turn out.
step 9: measure & cut paper for cover
Using the dimensions you already calculated for the book board, add at least 4.5" to the overall width & 3" to the height. This will give you 2” overlay for all sides & account for the 1/2" we need on either side of the spine. You don't want to butt your book ends up with your spine. Instead, you want at least a 1/4" gap between both.
For example: My book measures 5" wide x 8" tall with a 2" spine. When lain out flat, it becomes 12" wide x 8" tall. I want my paper to be bigger than my book board, so it becomes 15 1/2" wide x 9.5" tall.

Once you've got your paper cut, trim the corners to 45º but keep the thickness of the board in mind. Make the cut about 1/16" away from the edge of where the board will sit. When you fold the pieces over, it will cover that part of the board & hopefully have a little bit of overlap to hide the book board.. (The photo below is wrong, but you get an idea of what I'm doing.) Keep it neat because these pieces will be seen in the final product & you want them even. (I really hope I explained it right because I didn't take a photo of a corner to fully explain what I meant. oops!)
When you glue everything down, you don't want the corners getting bunchy with too much paper. By trimming out the corners, you are getting rid of excess paper, & the corners will look neat & crisp when you fold & glue the paper down.

i recommend cutting all of your pieces first before beginning the gluing process.
step 10: glue down paper to book board
To make sure I was gluing the boards down exactly where I wanted them, I first traced each piece onto my paper. Then, using PVA glue & a paint brush, I glued down all three pieces. You do want to work fast with this part because the glue does dry fairly quickly.
When folding over the paper, I recommend gluing the top & bottom down first, then the sides. You want the corners with the 45º corners cut on top, keeping all corners looking uniform. Like wrapping a present, pull the paper taught & rub any air bubbles out.

If you want to decorate your cover by layering papers or washi tape that will wrap around to the inside, now is the time to do that. Whatever you do you will want to make sure it wraps at least 2” so your end leaf covers up the ends.
There is no need to let the book dry before proceeding to the next step. This glue dries so quickly that you can keep working without messing it up.

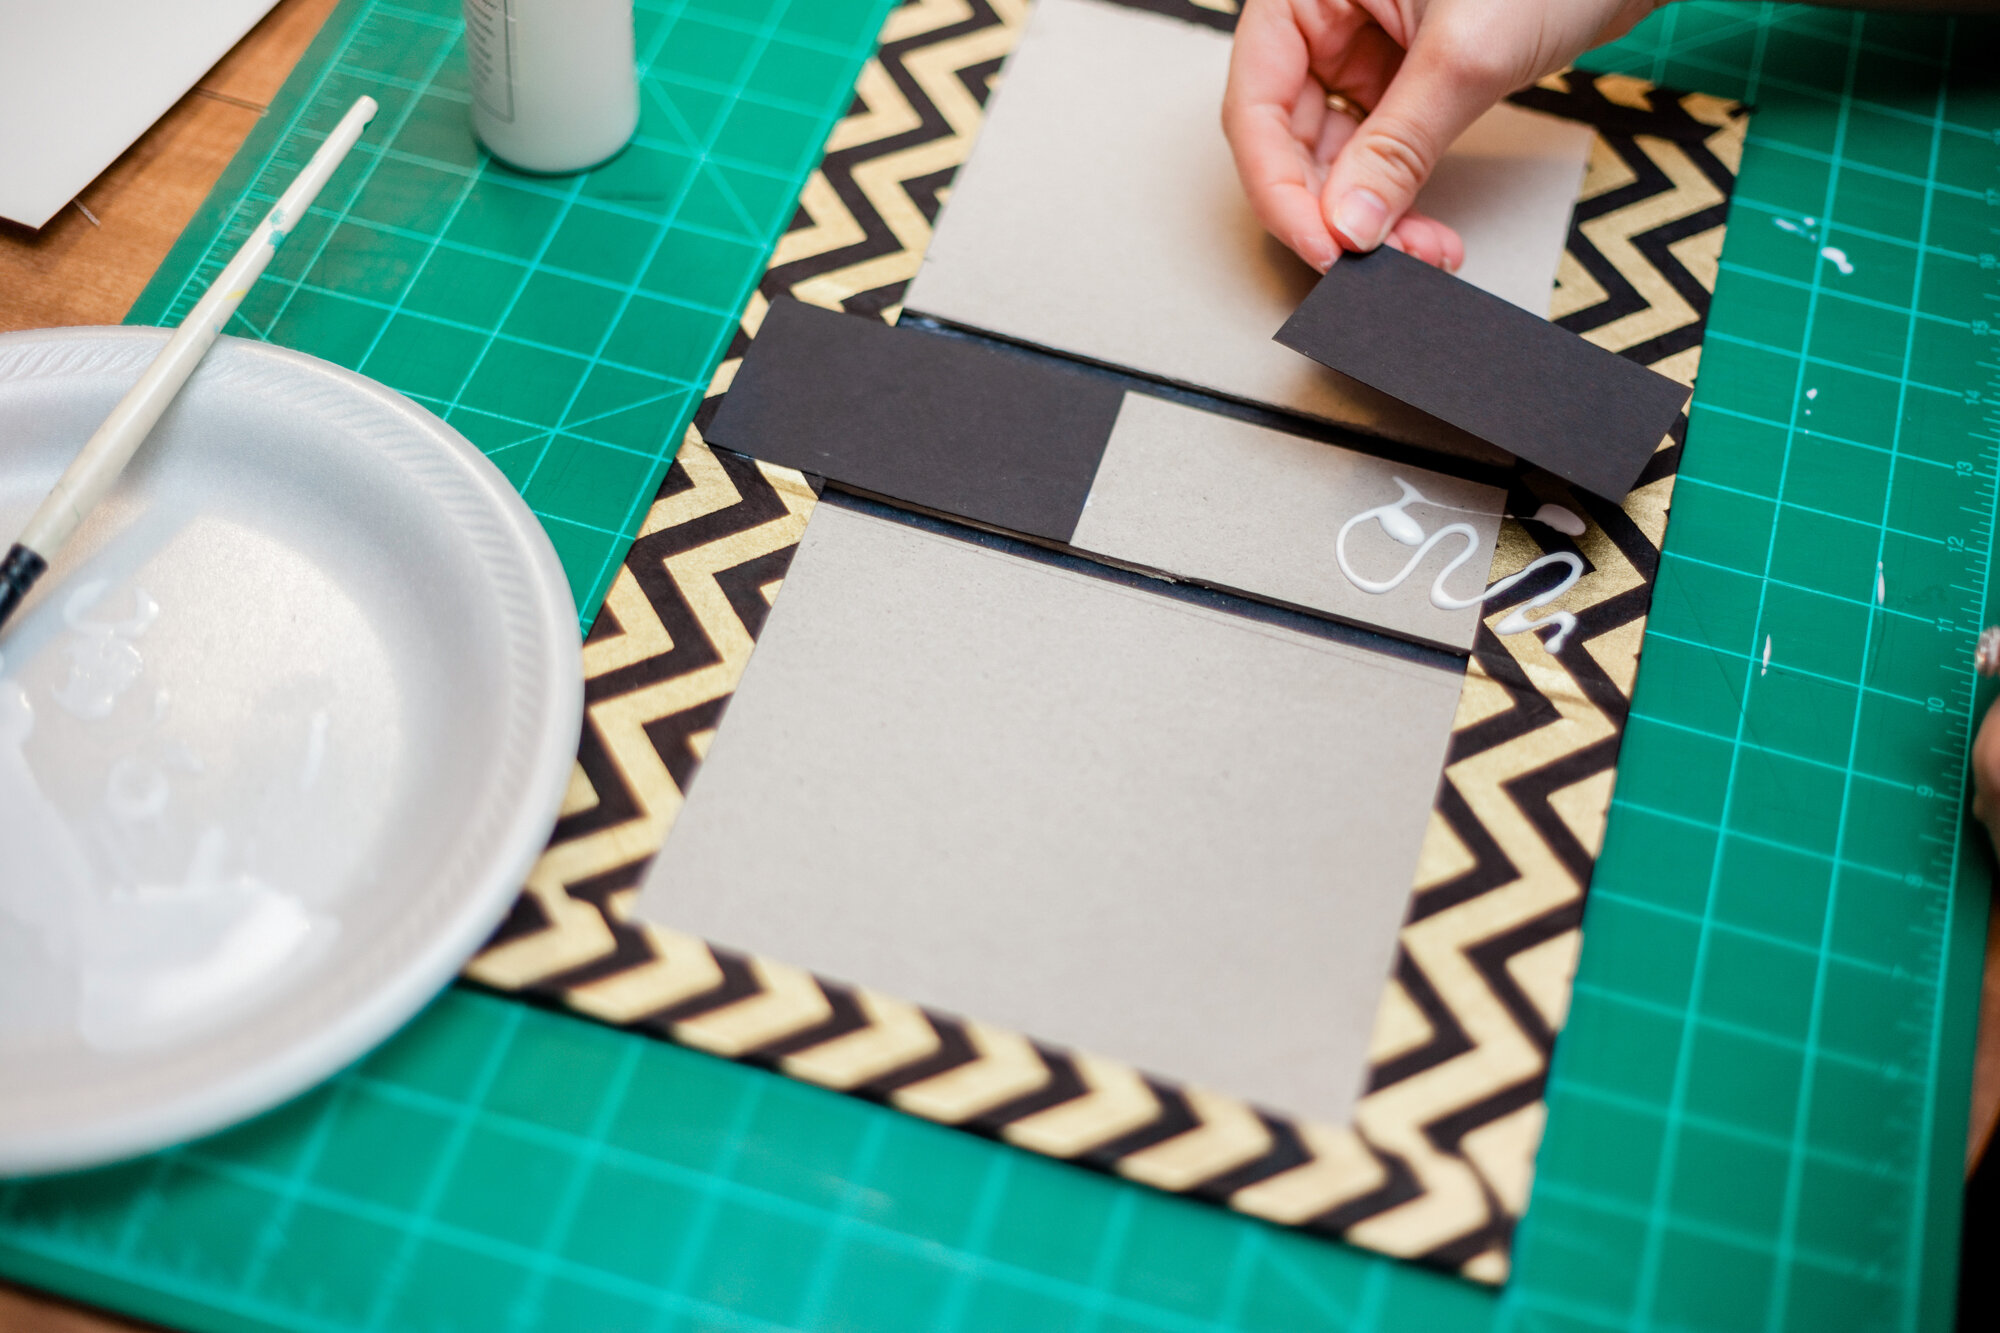
step 11: cover spine in cardstock that matches the end leaf
Because the cards are not all the same height, the spine will show through at the very top & bottom of your book. So, in the same material as the end leafs (black cardstock), I cut pieces that would fit directly on top of the spine. (I used two pieces because they were scraps & would cover the important parts.) If your spine is 2” wide, add at least 1/4” to the width. This will help cover any gaps.
step 12: cut & glue down ribbon
You want your ribbon to wrap around your entire card stack & have enough left to tie a bow. I used 1/4" ribbon, but you can use whatever your heart desires! You could even use multiple ribbons for a layering effect if you're feeling extra creative.
Find the middle of the ribbon & glue it down to the book board. Just a small amount of glue is all you need to keep it in place for now.
You’ll notice I use a green cutting board with a grid. It’s a self healing mat (sold at any crafting store) so it’s perfect for cutting on, but it comes in handy when lining things up. Line your book on the grid & find the center of your book. Use the grid to make sure you’re glueing your ribbon down to the center.


step 13: glue down the spine of cards
Concentrating on the spine only, spread glue on the canvas, then, firmly press it down onto the book board spine. Pull the flaps of canvas to make sure it's laying down flat & it’s centered well on your spine.


step 14: glue down canvas & end leafs
First glue down the canvas flaps to the book board, then, glue down the end leafs. Paint all the way to the edges of the end leaf so they don't peel up later.
Remember to smooth the end leaf down to get all bubbles out.


While the paper is still wet, fold the book over to let the end leafs settle into their natural spot. They might need to shift just a bit.

step 15: Grab some huge flat books to weigh down the covers while they dry
Open the book back up & lay heavy books on either end keeping your cards pointed up. I usually let these dry over night.
(Buzz Lightyear to the rescue as always!)

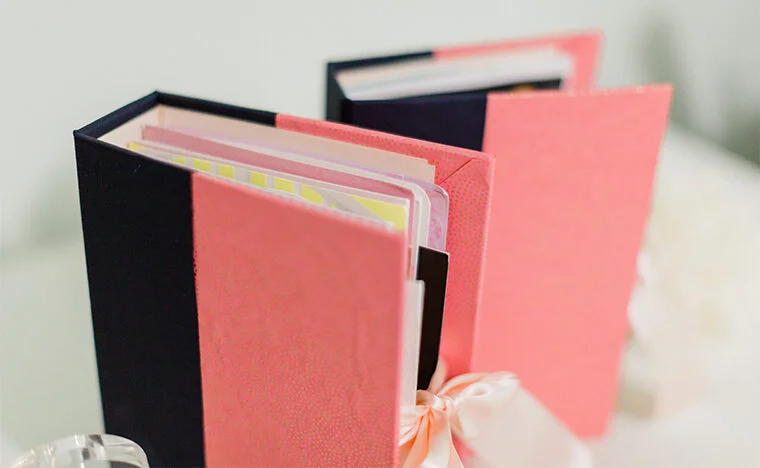
All done!


FREQUENTLY ASKED QUESTIONS
Can I use cardboard for the cover?
I’ve seen some people doing that & I think that is ok if that’s the best you have.
Will muslin work instead of canvas?
Muslin is too flimsy in my opinion. Probably any sturdy cloth you come across will be fine. I’ve only ever used canvas.
Can I sew in flat cards?
Yes. The concept is the same, except instead of 4 holes, you only need 3. When sewing, make a loop at each hole. I have discovered that books made entirely of flat cards will be much thicker when finished than you anticipate due to the threads in between each card.
What’s the smallest/biggest a book can be?
There is no minimum or maximum. I’ve made tiny 4x6” books with 15 cards & giant art books that were 10x18” wide. You just need to make sure your cover paper is big enough to wrap around the whole thing with plenty of buffer.
Can I sew in envelopes?
Yes. I don’t like to include too many simply because envelopes are usually made of much thinner/flimsier paper (they’re meant to be thrown away!) In those cases, I use washi tape to reinforce the crease before sewing.